Master – Agent
This section helps you create Agents, Team Leaders. Though some fields not mandatory & time consuming initially, would advise to fill up complete details as these are the same details we may be running from pillar to post later. The same link is used to create agents for Inbound, Outbound and Missed call campaigns.

Idle Status : By choosing No as an option you can avoid “Idle” option when you log in and get into “Available” option directly.
Agent TL Link :
The following screen would help creating teams with available agents & TL.

Agent Campaign Link :
The following screen would help linking Agents to Campaign. An agent can login into only campaigns authorised under this section. Agent skill sets are also categorised to allot the calls based on expertise for inbound campaign.

The primary gid will display consolidated list sorted by the status.

You can use Edit to edit the details
Master – Campaign

Name : Name of the campaign. Be precise and informative, so that you can identify easily without any confusion, over time as this get reflected in every report and agent screen.
Remarks : Small remarks about this campaign for identification
Start Time : Campaign start time, the dialling will start at the expiry of time automatically if Predictive mode is chosen.
End Time : Campaign end time, the campaign will be active from Start Time after which the dialling will stop automatically if Predictive mode is chosen.
Ring Timeout : Time to wait in sec before the dialler terminates the call if the customer does not pick the call Ideally 30.
Status: Active is currently active campaign. Inactive is active but suspended temporarily. Deactive suspended forever. You can toggle between the status quite easily at anytime.
Edit – Campaign


Name : Name of the campaign. Be precise and informative, so that you can identify easily without any confusion, over time as this get reflected in every report and agent screen.
Remarks : Small remarks about this campaign for identification
Process Owner : As we customise a few features for select companies and it is imperative to select that option to get the custom features and reports. eg: Airtel, Star Health, SBI Cards etc
Popup Path : The default call popup path is “popup/contact_view.php” and in case if we have designed customised popup then that path needs to be updated here. eg: “custom/tnschools/contact_view.php”
Status: Active is currently active campaign. Inactive is active but suspended temporarily. Deactive suspended forever. You can toggle between the status quite easily at anytime.
Quick Disposition Option : Disposition is mandatory to complete wrap-up process and to get ready to receive next call, but in case any customer is not interested to record any disposition for calls, the one and only short cut, is to choose this option where all calls will quickly get disposed as “Q”
Blacklist Option : This option would provide an option to blacklist any number while doing disposition by which any future calls both incoming and outgoing to that number can be barred
Duplicate Data Delete : If you choose Yes, this would not insert any number that is already existing in the same campaign.
Start Time : Campaign start time, the dialing will start at the expiry of time automatically if Predictive mode is chosen.
End Time : Campaign end time, the campaign will be active from Start Time after which the dialing will stop automatically if Predictive mode is chosen.
Ring Timeout : Time to wait in sec before the dialer terminates the call if the customer does not pick the call Ideally 30.
PD Dial Type : FIFO is First In First Out, LIFO is Last In First Out, this option would help you to dial by entered order or give preference for new entries. Today will dial only today calls and ignore all the calls that was imported before today
Dial Order Option : The choice Yes will help to automatically dial alternative numbers eg: residential or office or alternative number in case the primary number remains unanswered. The choice of selection pattern is selected in the forthcoming option. Kindly note this is not an automatic option but a manually driven option and it will generate new rows for any number on the selected pattern below (Dial Order Columns) for all the numbers as it remains unanswered
Mobile Masking : This option if enabled will mask the mobile number with XXXXXXXXXX in both popup and softphone so that the caller does not know to whom she is talking
Hide Columns : Our caller popup will display all the columns that got imported and this option will help to hide a few columns on the popup. Sample : [“ro”,”created_dt”,”Name”]
Dial Order Columns : As mentioned in Dial Order Option, this is where you choose the column to dial the alternative numbers in the order as mentioned Sample : [“first_name”,”Mobile_No”,”mail”,”whatsapp_no”]

Disposition of calls, is the heart of this process. Com1 offers 5 standard dispositions. Help Com1 Ip Pbx Agent Disposition – (com1pbx.com)
This tab helps you store remarks or secondary disposition data for all standard disposition. While 90% of the business will fall in the standard disposition, if you are part of 10%, you may have to take customised agent panel and create custom disposition.
Note : All our reports will have option to display only Standard dispositions while Custom dispositions are not part of any report / dashboard and only a raw report will be given. You have to design your own offline report from our raw report.

You can use Edit to edit the details.
Master – Campaign Creation
All the previous process creates masters, this actually creates campaign for calling. This is done by combining the database and master campaign. Ensure that this is done only after the complete data is imported to the database chosen, as you cannot add data or any subsequent data added to the master database does not get reflected here.

Campaign Type : This will load all active campaign.
Database Name : Some indication about the source of database to identify the campaign.
NDNC Filter : NDNC status of the campaign. Yes will import all NDNC registered numbers, No will import NDNC filtered numbers while both will import complete database. You will also get a warning of your selection if there is NDNC violation.
Type : Predictive or Progressive dialling is selected in this option.
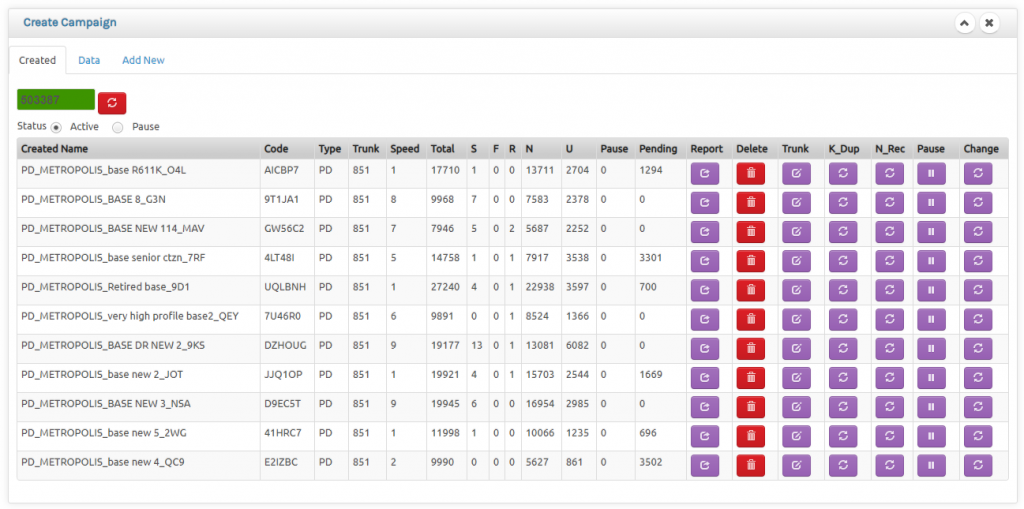
The count at the top gives an idea of records in database. If is shows in RED then it is time to delete the unused campaign and free up system resources for better performance. Refresh button refreshes the records to the current status.
Report : You can export the complete status of the campaign in an excel for your analysis.
Delete : This will delete the complete campaign data barring all funnel & reschedule data. Take complete precaution to avoid any accidental deletion of data. Be aware that data cannot be retrieved once deleted.
Trunk : You can change the trunk option here.
K_Dup : This option will delete any duplicate numbers present in database to prevent duplicate calling. This process normally takes time to complete. It is advised to run this option everytime you upload database to any campaign.
N_Rec : This will recycle and start dialling numbers disposed as No Response in the previous attempts.
Pause : This will pause any active campaign till it is unpaused under pause.
Change: This changes the type of campaign from predictive to progressive and vice versa at any point of time
Import Database
This section helps you import the data for the campaign created. Select the campaign name and choose the file and just import. You can keep adding data to the same campaign multiple times. In case if the data is too large, we recommend you to split and import. Ideally you can import in multiples of 50,000. For example if you are trying import a 2 lakh count database split the same into 4 even 50,000 files and import the same in 4 different cycles. You do not have to worry about duplication as you can use KillDup option to delete duplicate records.

First 3 columns are fixed and any mistake here will impact the campaign. While the first is used for Name, Second is for Mobile & third is for email details. Next 3 columns are for custom data which are relevant to campaign. We strongly recommend not to import data which you may not use for campaign as it may lead to a larger database over time creating a huge manageability issue. It will be a good practice just to import data relevant for agents and do not use this for data storage rack.
Agent Live
The Following Link will give an overlook of how a customer can manage the floor in live mode
Help Com1 Ip Pbx Callcentre Suite – Reports Export – (com1pbx.com)
Reports – Exports
The Following Link will give an overlook of all reports that can help manage the call center data & enhance productivity
Help Com1 Ip Pbx Callcentre Suite – Reports Export – (com1pbx.com)
Agent Login
This menu helps the supervisor or floor manager to login or logout agents from campaign.

Voice Logger

Search Options : While From Date & To Date is compulsory, but offers three different filtering options within a date range. Even in date range Today is separated and cannot be clubbed with any other date range.
Particular Disposition(optional) : You can add call disposition as an optional filter parameter. If left unselected all call disposition will be displayed.
Particular Number Range(optional) : Enter any number range between dates eg 19019 shall list all calls that has 19019 in any part of the number.
Particular Agent(optional) : You can add Agent as an optional filter parameter. If left unselected all agent details will be displayed.
Play – Just press this button if you want to listen to the conversation.
Download – You can download the file to your local computer. To play the file you need .wav compatible player , the most widely used being VLC media player which is available in all OS. Even the latest versions of browsers are capable of playing .wav files
Row Count View – By default system loads 10 last sorted data based on date & time of the call. If you wish more data on display you can choose 25, 50 or 100 option.
Data Sorting – If you wish to sort the displayed data, you can do so by clicking on the required heading. You can move to the previous or next page with the link provided in the right hand side bottom of the report.
Standard Disposition
Help Com1 Ip Pbx Callcentre Suite – Standard Dispositions – (com1pbx.com)
Agent Panel
Help Com1 Ip Pbx Callcentre Suite – Agent Panel – (com1pbx.com)
Call Centre Reports
Help Com1 Ip Pbx Callcentre Suite – Reports Export – (com1pbx.com)